Thursday, April 30, 2020

Go-to-Manufacturing Report

Introduction

Last week we submitted out Go-to-Manufacturing Report. In this report we dive into detailed analyses of out injection molded parts using Autodesk Moldflow simulation. Detailed drawings of necessary tooling are included. We also take a first pass at estimating several operational parameters necessary for producing yo-yos at a scale of 1 million per year. Finally, a simplifies schematic of a factory layout in included to visualize the space requirements for this operation.

You should be able to find the complete GTM Report here.

Yo-Yo Design Overview

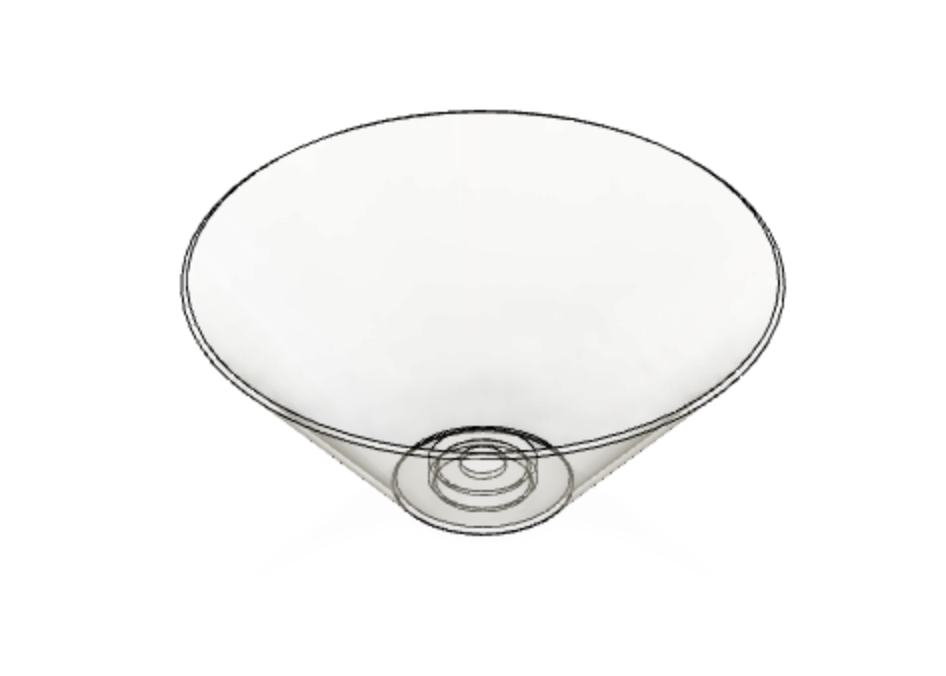
The final design of our yo-yo includes a plastic cup exterior, filled with swirling liquid and garnished with a lime, designed to mimic a Cosmopolitan cocktail.
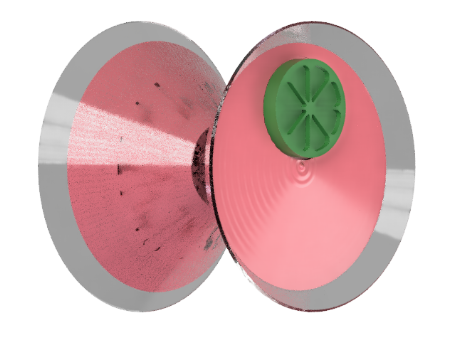
The yo-yo features three injection molded pieces and one thermoformed piece, as well as two press-fits. The exploded view and section view below label the components and how they interact with each other.


Moldflow Analysis

We used Moldflow to calculate the process and geometric parameters that would allow us to achieve the optimal combination of rate, cost, and quality for our injection molded parts. All analysis was conducted assuming the use of polypropylene material with a 392° F injection temperature, 68° F mold temperature, and a maximum injection pressure of 37000 psi, corresponding to the capabilities of the BOY-22A. Some examples of our results are shown below. 

Design Changes

Based on Moldflow analysis as well as mold design considerations, we modified the injection molded part geometries to achieve the highest chance of producing high-quality parts which will fit together properly. Our changes are summarized as follows:

General


  • Scaled up parts based on estimated shrinkage when designing molds
  • Added tolerances for interference fits based on part size and capability of milling machines
  • Left tolerances low wherever possible (aesthetic parameters) 

Lime


  • Hollowed out inside of press fit to promote more uniform cooling 

Liquid


  • Added draft angles on inside of liquid bottom
  • Considered alternative ripple designs for liquid top but kept original design-based mold-making feasibility
  • Added filets to sharp corners on the liquid top to comply with smallest tool diameter
  • Changed thicknesses on certain areas to comply with smallest tool diameter


Material Selection

A summary of our materials choices is shown below. 

String

50/50 blend of cotton and polyester for high friction, durability, and comfortable feel. 

Glass

HDPE was selected because of its very high strength and clear glass-like finish. PETG was considered but is brittle especially at thinned locations such as the one in the yo-yo. 

Liquid Bottom/Top/Lime

The injection molded parts will be made from polypropylene. Polypropylene is inexpensive and resistant to impact forces. Additionally, it works well with snap fitting such as in snap-over lids. Other materials were considered such as ABS, polycarbonate, ABS/PC, polyamides, acrylic and polyoxymethylene. 

Bill of Materials


Tooling

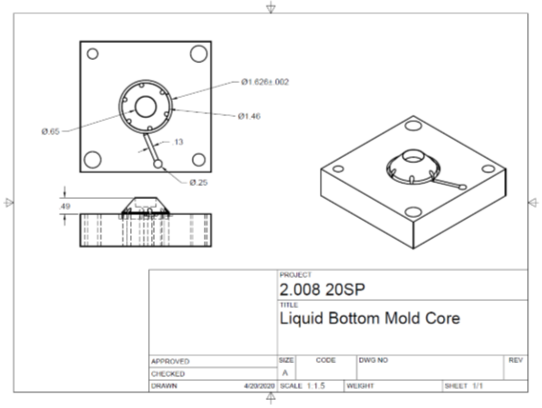
We created drawings for the tooling used to create our yo-yos. Each tooling is designed to be manufactured from aluminum stock on the TRAK milling machine. The tooling includes the Glass Die, Liquid Bottom Mold Core, Liquid Bottom Mold Cavity, Liquid Cap Mold Core, Liquid Cap Mold Cavity, Lime Mold Core, and Lime Mold Cavity. The Glass Die is the tooling for our thermoformed part, and the remaining molds are for injection molded parts of our yo-yos.

For the lime mold, we needed to create a custom tool based of commercially available end mills. The narrow slots require low cutting forces and a long cycle time to ensure good finishing. We went with a 0.020" flat end mill which had a length of 0.75". Though this tool is very long, we minimized deflection by reduction the amount of material removed with each revolution. The finishing passes are done with a separate tool of equivalent size to ensure high quality surfaces. 

Some examples of tooling drawing are shown below.


Production

The following table shows several of our underlying assumptions and resulting operational requirements in order to fill a production demand of 1 million yo-yos per year. 

Molding Cycle Times

A key driving factor in how our production rate is the cycle time of each injection molding operation. The following table and donut charts show cycle times for each injection molded part and their respective breakdowns. 


Injection Molding Cost Estimates

Detailed cost estimates are listed in the table below. They are organized by material cost, mold cost, molding cost, total cost, and total cost per shot. 

Thermoforming Cost Estimates

Industry experts advised our team to contract out the thermoforming process since we could realistically achieve production rates an order of magnitude greater than what we can achieve with our injection molding process. To avoid investing in equipment that will run for one or two months a year and remain idle for the rest of the time, we will be contracting out the thermoforming production of our plastic glass parts. 

Innovative Plastics quoted us a price of $50,000 to deliver 2 million plastic glass pieces made of 0.030” HDPE. They told us that they could fill our order in two months. 

Total Costs

Factory Layout

Based on our calculations, we can up with a simplified schematic of what a factory floorplan might look like. 


Tuesday, April 14, 2020

Only Shooting Stars Break the Mold

We've been busy working on our aluminum mold designs this week. After learning how to use Moldflow, we've been able to estimate the resulting shrinkage for each parts and adjust our mold designs accordingly. We are preparing to deliver our Go-to-Manufacturing Reprort next week as if we were submitting it to a supplier to receive cost estimates for mass production. The goal is to operate at a scale of producing 1,000,000 yo-yos a year.

Liquid Bottom 


I'm concerned about the injector pin locations being on the conical surface, but there's no other good place for them

Liquid Top

Here is are the two mold halves for the the liquid top. We currently don't have any major concerns with the design, altough a few dimensions did have to be changed slightly to accomodate avalable tool sizes. 

Lime

The lime design was adusted to remove material from the center and improve wall thickness homogeneity. We will need to use a special flat endmill to make the thin rib features that we don't have in the lab. Fortunately, we found a 0.020" endmill on McMaster-Carr (8915A22) that will do the job.


The quality of the part is very high overall, with just a few spots that can be explained by sink marks. Moldflow simulation indicates that the shrinkage for the lime is 0.986%. An additional gate was considered but did not affect the shrinkage enough to be included in the mold design. Overall, this is a small piece and the quality prediction is high, as well as a 100% confidence of fill, so we are happy with this lime.

Glass

This is the die for thermoforming the glass. There are no major concerns with the design, and it should work very well for thermoforming because of its moderate slope. The tool path might need some changes to reduce time while achieving the final shape, but otherwise, it is near completion.

Factory Planning

For the Go-to-Manufacturing report, we will need a detailed plan of our ideal factory layout as well as cycle time estimates and operational parameters needed to determine factory costs. We have begun to compile injection and cooling time data from Moldflow siulations as well as assembly time estimates from collecting empirical data on the time it takes to assemble LMP yo-yos. The LMP yo-yos should be a good proxy for our yoyo as both yo-yos require one main press fit as well as a thermoformed part per half. Our yo-yo includes an extra small press fit, the lime, which we can take into account with a safety factor or by simply timing an additional pressfit. Once we are satisfied with our time estimates, we can begin figuring out how many of each machine we will need and what our factory floor will begin to look like. We will, of course, take into account the variability of the yo-yos and determine what percentage of them will need to be rejected for quality assurance. This will directly impact the effective rate at which we can produce yo-yos. We can potentially use the empirical variability data collected for the LMP yo-yos as a way to estime the variability of our yo-yos. 

Friday, April 10, 2020

Newest Team Member

Hello!

My name is Hector, and I'm excited to be joining Hector's Team. As announced on our previous blog post, several of my previous teammates dropped the class due to the quarentine, so I was reassigned to a different team. It's great to finally be a part of the team that was named after me.

I am a senior majoring in mechanical engineering with a concentration in robotics (2A-6). Outside of school I enjoy working on my startup, rock climbing, and playing guitar.

Tuesday, April 7, 2020

updates from quarantine

A few weeks ago we were told that MIT would be shutting down and we would all be kicked off campus due to the coronavirus pandemic. For some of us, 2.008 lab was the very last class we ever attended in college :')

Class was put on hold for a bit while everyone scrambled to move out and professors worked on plans for virtualization, but now here we are, spread out across the country but still determined to perfect our cocktail yo-yo.

This weekend, the team met up on Zoom for the very first time since the apocalypse started. We finally had everyone together at once, so we took our group picture.


The following day however we added another member to our team so actually we still don't have a full group picture. Hector's team is proud to announce that Hector has officially joined, due to everyone on his *other* team dropping the class.

After a group cry, the first productive thing we did on our Zoom call was finalizing our yo-yo design.


Having the lime on the glass was nicer on the eyes but was giving us too many problems due to its complex shape and method of attachment, so we changed the design to have the lime press-fit onto the liquid, mimicing floating.

We al also decided to go with the single spacer design over the double spacer design.

Since the global pandemic has left us without access to a real injection molding machine (sad), we all downloaded Autodesk's Moldflow Adviser to simulate the injection molding conditions and outcome of each of our parts. Moldflow is slow and non-intuitive but thankfully we had a handy how-to that shop staff made so that we wouldn't be confused. Unfortunately the first time around most of us didn't actually use that document and were confused as to why our results kept showing 100% bad on every analysis. Don't worry though because now we've got it on lock.

We input our machine parameters and preformed gate location, pack and fill, and warp analyses. Here are the results:

for the bottom liquid piece, the shrinkage comes out to 1.25%

for the lime, we see 1.07% shrinkage. 


the liquid cap shows 0.89% shrinkage.


We did decide to keep the lime as just one piece, but since it is thick&chunkyTM we were worried about the quality of the fill.


Moldflow shows that the quality is likely *ok* but we might have issues with the cooling. If we weren't doing online school we would ignore this warning and test it anyway to see how it comes out in real life but we can't do that so our next steps for the lime will just be discussing these results with the shop staff. 

In conclusion we hope we can manufacture our yoyo irl at some point because zoom is sad and simulations are sad and cocktails are good. 

Final Report

Introduction In the last week of classes, we are happy to present our final report! In this report, we discuss our final yo-yo design an...